Equipment Reservation
Instructions
|
Point your web browser to http://www.wfu.edu/~cottrell/commdept/
You will be asked to input your
user name and password. These are the same user name and password that you
use to access the campus network. This establishes for the reservation system
who you are, so that it can accurately display your
reservation status. The first time you access this web
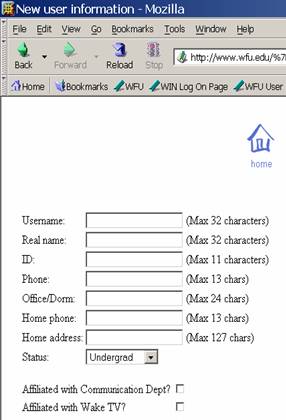
page, a dialog box will tell you that you are not a registered user and will
ask you if you want to register. The form asks forthe following
information:
· “username,”
which is yourcampus network user name · “real
name,” which is your first and last name · “ID,”
which is your student ID number · “phone,”
which is your local phone number (this should be the number you most
regularly check locally, which in some cases may be a cell phone) · “office/dorm,”
which would be an office location for faculty/staff or a dorm or local
address for students · “homeaddress,” which is where you go when the campus closes — your actual home · “home phone,” which is the phone
number at the place where you go when the campus closes
· “status,”
which should be “undergrad,” “grad student,” or “faculty/staff” · “affiliated
with Communication Dept.?,” which you should check
if you are enrolled in a COM Dept. media production class or if you work for
the COM Dept. · “affiliated
with Wake TV?,”which you should check if you are an
active member of Wake TV Once you submit this information,
your application to become a registered user must be approved by a system
administrator, at which point you will be added to the database and will be
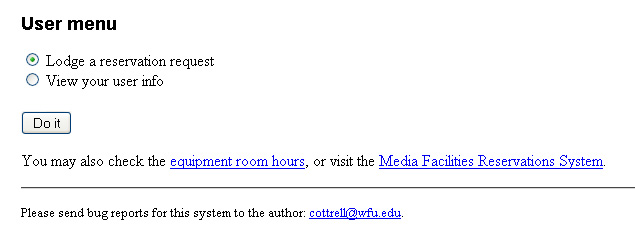
able to use the system. Once you are a registered user, you will see a “user
menu” upon logging in. The options are to view your user profile or to view
or make a reservation. Select the appropriate radio button and then click “Do
it.”
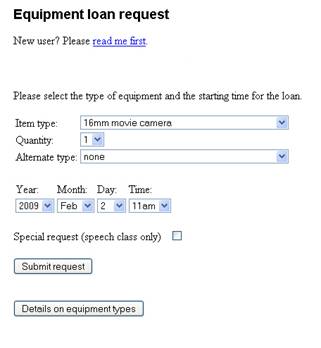
This action will
take you to the “equipment loan request” page.
Begin by
selecting a pickup time for the loan. Select from the appropriate drop down
menu a month, day, and time. Important note: Be sure to choose your pickup time
carefully. In particular, be sure that you have chosen a time when the
equipment room will be open. This is important because the system is set up
to make reservations active only during a three hour window, which extends from one hour
prior to the stated pickup time until two hours after the stated pickup time.
If you make a reservation for 2:00pm, for example, the reservation will be
active from 1:00pm until 4:00pm. After 4:00, the reservation will be
automatically deleted from the system, which means that the equipment you
reserved will be available for others to check out. This safeguard was built
into the system so that a forgotten reservation would not cause equipment to
be held needlessly when other people could have been using the gear. Important Note: The equipment loan period is 48 hours.
This loan period was chosen because experience taught us that 24 hours is
generally not sufficient for a student to get equipment, get out to a
location, complete a shoot, pack up, and get the gear back in. However, this
loan period entails a couple of consequences that must be borne in mind:
Next, select a
quantity from the drop down menu. Multiple quantities will most commonly be
used for selecting such items as batteries, but may apply to any item if
multiples are needed and available. The “Alternate
Type” field may be used, although it is fine to leave it in the default
value, which is “none.” Using this field may save time in instances where one
item is preferred but another similar item would work if all the preferred
items are already reserved. For example, if you want a PD-170, but the PD-170
is already booked, a PD-150 would almost certainly work just as well. If you
go ahead and enter PD-150 in the “Alternate Type” field the system will make
the substitution for you automatically rather than just rejecting your
request if the PD-170 is unavailable. After all these
choices have been made, click on “Submit Request” to begin the reservation
process. You will then see a screen that looks like this:
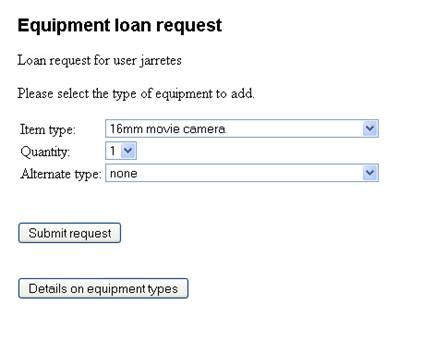
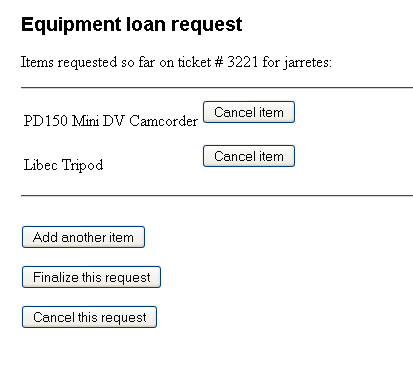
Note that your
first item is listed, and a ticket number has been assigned. The system is
now ready for you to submit additional items on the reservation. To do this,
click on “Add Another Item.” This
takes you to a screen that is similar to the initial screen, but without the
date and time information. The pickup date and time that you originally
entered are now associated with your ticket number in the system and so need
not be entered again.
Proceed as
before, selecting an item type and quantity, and alternate type if desired,
and then click “Submit Request.” This will take you back to the screen that
keeps a tally of all the items you have selected so far. If more items are
desired, click “Add Another Item” again.
Once again,
repeat the item selection process. In this example, I am adding two batteries
to the reservation, as the tally page shows:
Repeat this
process until you have selected all the items you will require. Then click “Finalize
This Request.” Your request is
now in the system. A system administrator will have to review it and sign off
on it before it can become active in the system. This normally happens within
24 hours. |