Adjusting Lexmark 1275PS Color
One can adjust Lexmark 1275PS color output to match your monitor. You can take the settings that work for me to see if they are satisfactory, or you can develop your own.
To change the color output of the Lexmark 1275 PS from Windows:
- Select "Start, Settings, Printers".
- RIGHT click on the Lexmark 1275 PS. Click "Properties". You should
see the window below. Select the "Color" tab. Select the settings
circled in red.
- Next click the "Advanced" button of this window, circled in green.
That brings up the "Color Properties" window shown below.
- Select "Use the values". Adjust the various sliders to get the color shift you want. The settings above work well for me.
How to choose optimal settings
Obviously you want to adjust the above sliders to get the best match of the image on your monitor to the image on the printer. You will need to print test images to get the picture right. Try to choose a well exposed image with good flesh tones. The test image I use is the one below:
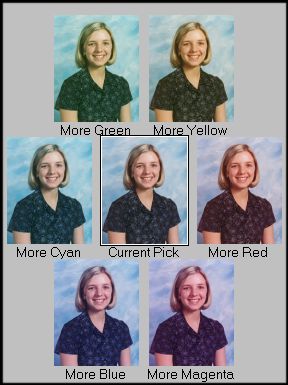
This above image has the center picture picture shifted toward each of six spots on the color wheel. The "More Green" image is shifted toward green.
Print the above image. (And please do not print it full page. Cost!)
First adjust the brightness setting for best match. (Note that you may have to close the Lexmark properties window each time before printing.)
See which printed image in the circle looks closest to the center image on your monitor. Shift the sliders in the opposite direction. For example, if "More Green" looks best, it means that the printer is not putting enough green in the paper. Lower the "Green" setting, while increasing "Red" and "Blue" by half the amount you raise the green. (We want to keep overall brightness constant for now.)
Similarly, if "More Cyan" looks best, increase Red, while decreasing Green and Blue by half as much.
I will leave the contrast and saturation settings to you.