More convenient file access in Windows and Office
I like to be able to reach any of my favorite directories in only a very few clicks of the mouse when opening and saving files.
I am a firm believer in making extensive use of directories, sub-directories, sub-sub-directories, etc. While such hierarchy may mean that finding the file I want is straightforward, getting to the file may take many mouse clicks as I navigate through the directory structure. Fortunately, Windows XP and Office offer several ways to speed this process. There are four places I stick my favorite shortcuts:
- The Places Bar. This appears as a pane of the File Open dialog of most non-Office applications.
- A Favorites folder . Have your favorite directories accessible from the task bar.
- My Places Bar. This appears as a pane of the File Open dialog of most applications.
- The Work menu in Microsoft Word. Here you can add frequently accessed documents.
Adding to the Places Bar in Open and Save dialogs
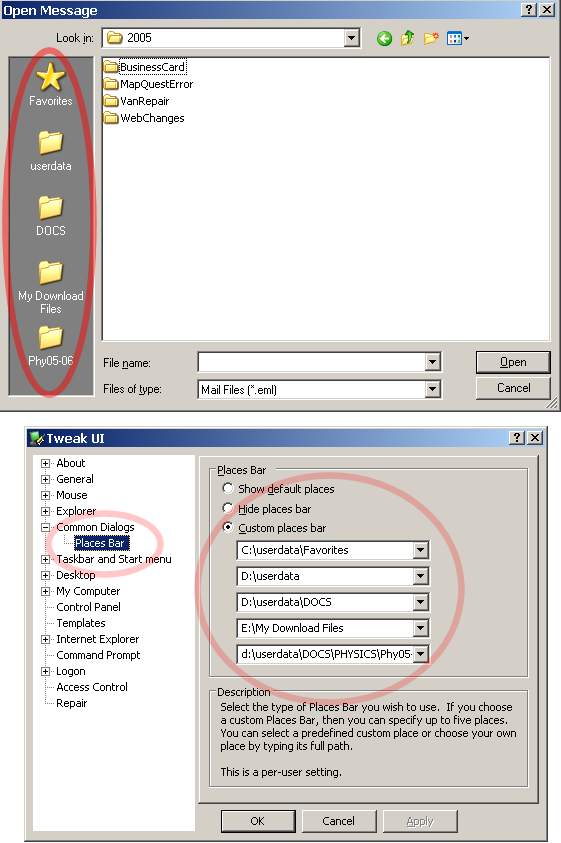 You can add up to five of your favorite folders for one-click access in most "open" and "save" dialogs. In the screen capture at right, the five folders in the left pane ("Favorites", "userdata", "Docs", "My Download Files", and "Phy05-06") are accessible in one click.
To create these favorites, you need a free. Microsoft application called "tweakui." Wake Forest users already have this installed, but others may need to download from Microsoft and install it. (Just do a web search for "tweakui microsoft".)
With tweakui installed, click on the Start menu and choose Run. Then type "tweakui" in the Open box.
That brings up the "Tweak UI" application, as shown in the second figure.
Choose Common Dialogs > Places Bar.
That in turn brings up the Places Bar dialog in the right pane of the Tweak UI window. Click on the "Custom places bar" button, and then enter the full path name of each directory that you want on your places bar.
Click "OK" and you are done.
Are five folders not enough? Five is the limit for one-click access, but you can have many more available in two clicks by creating a directory filled with nothing but shortcuts to your favorite directories. This is what I call my "Favorites" folder. Notice that "Favorites" is one of my five folders on the Places bar, and so is always easily accessible. See how in the next section.
Creating a Favorites folder
This section assumes you know how to use Windows Explorer to navigate and create folders.
- Open Windows Explorer.
- In the folder where you keep your own files ("C:\Userdata" for Wake Forest users, "C:\My Documents" for most Windows users) , create a folder named "Favorites" if it does not already exist.
- Open another instance of Windows Explorer.
- Navigate to the folder holding the folder you want to add to Favorites. Right click once on the folder you want to include, and choose "Copy."
- Right click an empty spot in the right pane, and choose "Paste shortcut." If the folder was named "foldername", the shortcut will be named "Shortcut to foldername."
- Click and drag "Shortcut to foldername" to the Favorites folder.
- Rename "Shortcut to foldername" in its new location to "foldername."
Accessing your Favorites folder from the Taskbar
You can add any folder, including Favorites, to the Taskbar. Just
- Right-click on the Taskbar.
- Choose "Toolbars".
- Choose "New toolbar."
- Navigate to the folder you want to add, e.g., Favorites, and click once on the folder.
- Click "OK.
This creates a toolbar on the Taskbar that allows you to go directly to any folder or file in "Favorites". You can change the order of the entries in this toolbar by clicking and dragging up or down.
Microsoft Office Applications
My Places
Microsoft Word, Excel, PowerPoint, etc., ignore the Windows Places bar. Instead, Office maintains a separate list of "My Places." These are displayed the same way as the Places bar in other applications, but you add folders in a different way.
- From within any Office application, choose File > Open.
- Navigate into the folder you want to include.
- Choose Tools > "Add to my places".
That's it. The folder name now appears in the left pane of all Office open and save dialogs.
The Work Menu
Another nice trick in Word is to put your most frequently accessed files on a "Work" menu. If you do not see a "Work" menu in Word,
- Right click on an empty space in the tool bar region at the top of the Word window, which brings up a list of toolbars.
- Choose "Customize".
- Click on "Built-in menus" in the left pane, and scroll to "Work" in the right pane.
- Click and drage "Work" to the location you want in the menu list just below the title bar of the Word window.
Next, open the document of interest, click on the Work menu, and choose "Add to Work menu."
Now any of your favorite documents are two clicks away.
Comments on this page? Contact Rick Matthews at matthews@wfu.edu.