Getting Started in Dreamweaver
Introduction
Dreamweaver is a powerful yet easy-to-use web authoring package. However, I have found (partly through personal experience) that Dreamweaver does not appear easy at all until you get through about 20 minutes of nonintuitive setup. This page is designed to bring you through those 20 minutes with a minimum of pain. Follow this, then spend another hour playing with Dreamweaver, and you will be hooked. (Note: this page assumes you are at Wake Forest University, but it may be of value to others by making some fairly obvious translations.)
This page assumes your Wake Forest web page already exists. If not, see "Creating and Maintaining Your WFU Homepage" to create the initial web page.
Before you get started
The easiest way to edit Web pages at Wake Forest is to map your web directory as a network drive on your PC. This means that you can create, edit, and save files in your WFU Web directory just as if it were a local hard drive. Here is how to do this in Windows. (If you are connecting via a modem, go to "FTP access in Dreamweaver." When you have finished that page and return, skip down to "What's next.")
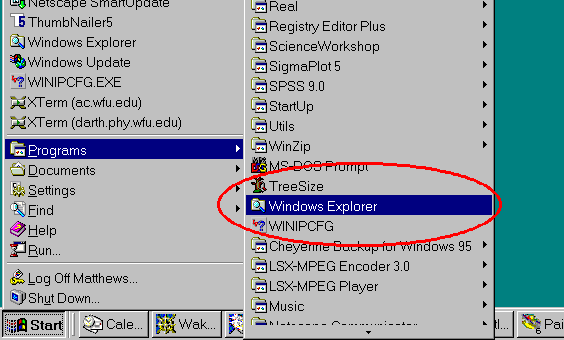
From the Start menu, run Windows Explorer:
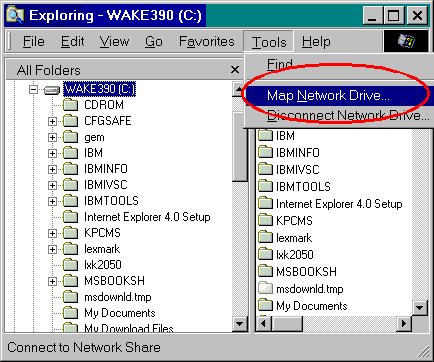
Choose "Tools > Map Network Drive":
Select "W" for the drive letter and "\\ACFILES\WWW-HOME" for the path. Check "Reconnect at logon" so that you do not have to do this again.
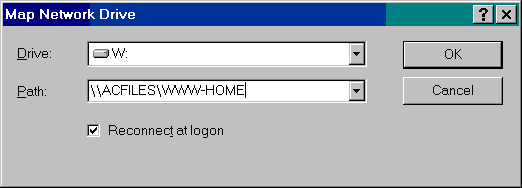
Congratulations. Your web directory now appears as drive letter "W:".
First steps in Dreamweaver
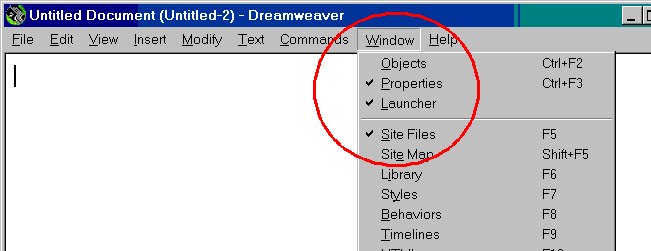
Run the Dreamweaver program. (If you do not have it, it is available to WFU students and faculty.) The first thing you need to do in Dreamweaver is to get the right combination of windows up. The windows you need are "Site files", "Launcher", and "Properties". You will also have another window for each web page you are editing. If you have other windows open, just close them for now to avoid confusion.
If you see the above windows when you run DW, all is well. If not, look for a "Window" menu title in your "Untitled Document" window, and be sure that the appropriate options are checked:
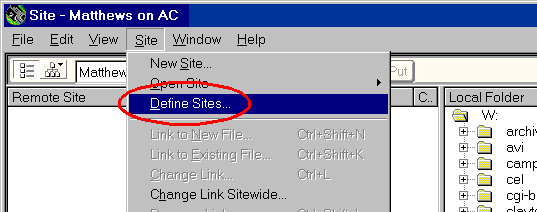
Next consider the "Site files" window. This window is an enhanced version of Windows Explorer optimized for web site management. We need to tell it how local file names correspond to URL's. Choose "Sites > Define Sites."
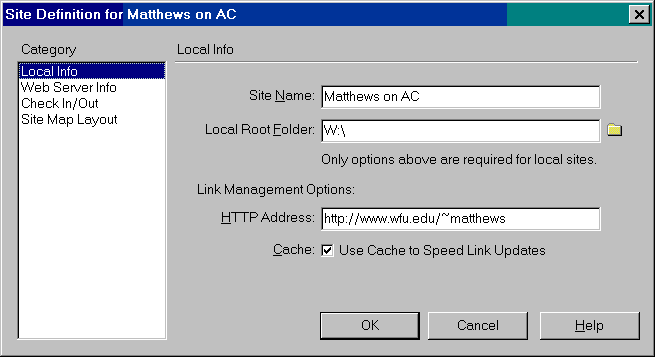
Select "Local Info" as your Category.
Choose a "Site Name" for your web site that is meaningful to you, such as "My home page". In the example below, I chose "Matthews on AC".
Local root folder is "W:\", consistent with the drive mapping of the previous section.
"HTTP address" is the URL where your directory appears to the outside world via the web.
Check "Use Cache to Speed Link Updates."
Click "OK".
Your site is now defined, and you can begin creating web pages. You may use the "Site" window like Windows Explorer to create new files, open them, create directories, and move files from one directory to another. DW will automatically update all links when you move a file within the "Site" menu.
What's next
Creating files in DW is much like using a word processor or any other Windows program. Start with "File, New." Next "File > Save As" to choose a name and location for the file. You may now begin editing in the usual way.
The most significant difference is DW's "Properties" window. This is where most of the good stuff happens.
The properties window is where you choose
- the format (a.k.a. style) of a paragraph. (These styles are the recommended way of controlling font size and appearance for most web pages.)
- the font and size.
- whether text is bold or italic.
- Whether text is left, center, or right justified.
- bulleted or numbered text.
- link addresses.
The use of these functions is reasonably straightforward. I encourage you to
use the ![]() icon to bring up a file
browser to select files within your site to which you are linking. This avoids
typographical errors. More importantly, it will define the link address as a
relative link that will be much more portable if you move files or the
whole site.
icon to bring up a file
browser to select files within your site to which you are linking. This avoids
typographical errors. More importantly, it will define the link address as a
relative link that will be much more portable if you move files or the
whole site.
The next place to begin exploring is the "Insert" menu in the web page window. This is where you will be able to do cool things that add personality to your page, such as
- Images
- Tables
- Horizontal rules
I also suggest you choose "Modify > Page properties" to select a title for your page. This is the title that is displayed in browser windows and in bookmark lists.
Beyond these tips
To go beyond this, I recommend
- the online tutorial found under Dreamweaver Help.
- the WFU Interactive Technology Center's Dreamweaver tutorial in pdf format.
- The web development guide maintained by IS. This page is nice for site-specific information for WFU.
- My page on how to implement access counters in Dreamweaver.
An editorial
Trying to decide whether to use Dreamweaver or Frontpage? They can mostly generate similar results. However, there are two major disadvantages to Frontpage:
- Full capability requires that your pages reside on a server which runs Microsoft's web server software. (A few departments put up their own Microsoft servers so that their users could reap the advantages of a decent web authoring package. At the time, the university licensed Frontpage, but not Dreamweaver.) Porting Frontpage generated web pages to a non-Microsoft site is difficult. Dreamweaver generates completely portable code. If you decide to change service providers or web server software, your code will still run with Dreamweaver.
- Frontpage mangles the HTML of your web pages, so other authoring packages have difficulty dealing with it.
Both these mean that Dreamweaver puts you at much less risk of future problems.
Email suggestions to matthews@wfu.edu.
[an error occurred while processing this directive]