Animated Tutorials using Paint Shop Pro
Introduction
Animations can convey process much more effectively than static pictures. Paint Shop Pro is ideally suited for making these animations. One can draw the individual pieces on different "layers", quickly change which layers are visible in each image of the animation sequences, then weave the individual images into an animated file that is remarkably compact.
Here are a couple of examples of tutorials I have done:
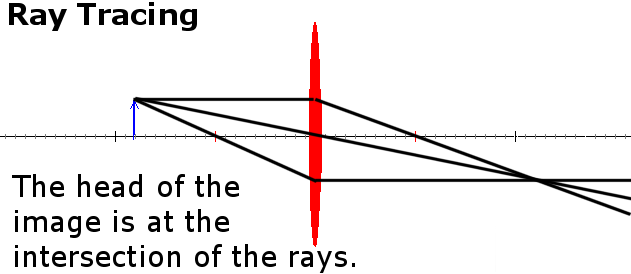
The key advantage of animated tutorials is the eye's ability to immediately detect small movements or changes in one's field of view. Consider the following two images.
First Image:
And now consider the second image:
You may have noticed the difference immedately, but many people require a few moments study to detect the change. Contrast this with the following animated GIF:

These methods are equally applicable to less technical topics. An evolving map shows the history and develop of a region far more clearly and effectively than does a static presentation.
The specific kind of animation discussed here is the animated GIF. If the images are mainly line art on uniform backgrounds, animated GIFs can be quite compact, squeezing many "slides" into a file small enough to load quickly even over a modem. Constructing an animation consists of three steps:
- Construct a layered image with layers containing all content of the ultimate animation.
- Hide and reveal elements in the combinations that will make up each frame, exporting each combination as a separate GIF image.
- Weave the individual GIFs into an animation, using Paint Shop Pro's Animation Wizard.

The lessons
- Working with layers and vector objects to construct frames for animated tutorials.
- Adding raster images to animated tutorials.
- Using Animation Wizard.